ShipGear’s default interface is set up to automatically write freight and tracking information back to QuickBooks Online when you ship against Sales Receipts and Invoices.
Note : For all document types, updated shipment information is available through your carrier software history and/or the Dashboard module.
To customize Write-Back Settings :
To change how and when freight write-back occurs, edit the default write-back settings as shown below.
When you save or void a shipment in the carrier system, decide if ShipGear writes the following to the source document :
Freight
When this option is checked, ShipGear will write the freight amount back to Sales Receipts/Invoices. This is the default setting.
Shipment Detail
When this option is checked, ShipGear will write the shipment detail in the grid back to Sales Receipts/Invoices. You can choose to write back to one of these fields.
Message : "Message displayed on the invoice" field in QuickBooks Online
Memo : "Statement memo" field in QuickBooks Online
The Label, or printed title, precedes the Field information. The Field is the field value from the carrier system that will be written back to QuickBooks Online under it's corresponding Label.
To change an existing entry, click inside the row and type, or make a selection from the drop-down list (if applicable).
Add Label/Field names : To add Tags, position the cursor in a blank field and begin typing. Then, select a Field Name from the drop-down list to be associated with the new Tag.
Delete a row : Hover over the rowbar until an arrow appears. Single-click with the mouse so that the row is highlighted. Then, press Delete or Enter on your keyboard.
Click the Apply button to save your changes.
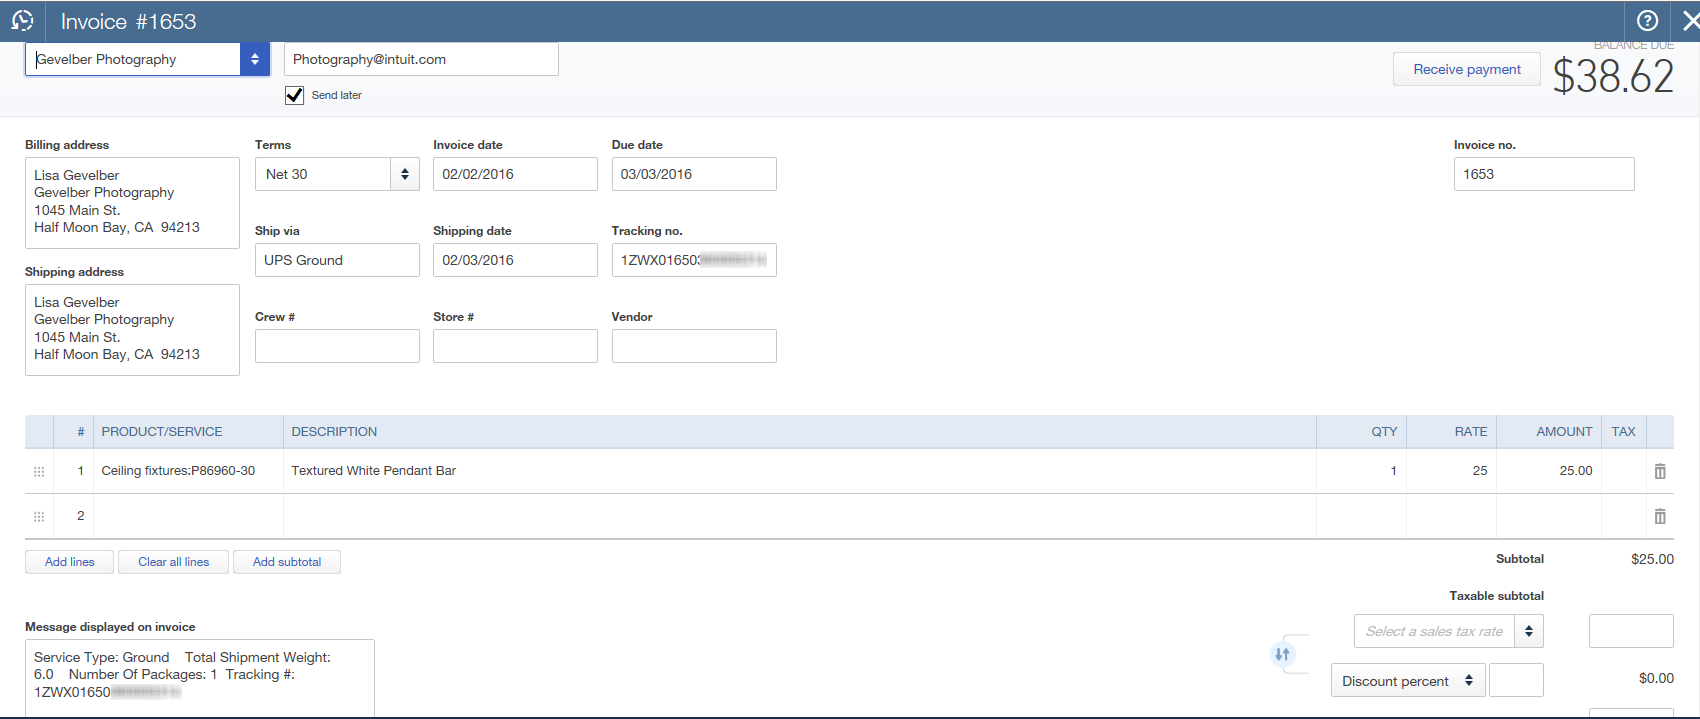
Here is an example of what shipment detail write-back looks like to the Message field on the Invoice in QuickBooks Online.
Note : If you modify and reprocess a shipment on the same day, ShipGear will update the Ship Via with the new Service (if applicable), and append the new freight and shipment detail to the existing entry.
Select this option to turn off write-back to QuickBooks Online.
Click the Apply button to save your changes.
ShipGear updates the freight amount with the current freight for all shipments against a Sales Receipt/Invoice. This screen is where you define what the freight amount should be.
Define the Freight Amount
Make a selection from these choices :

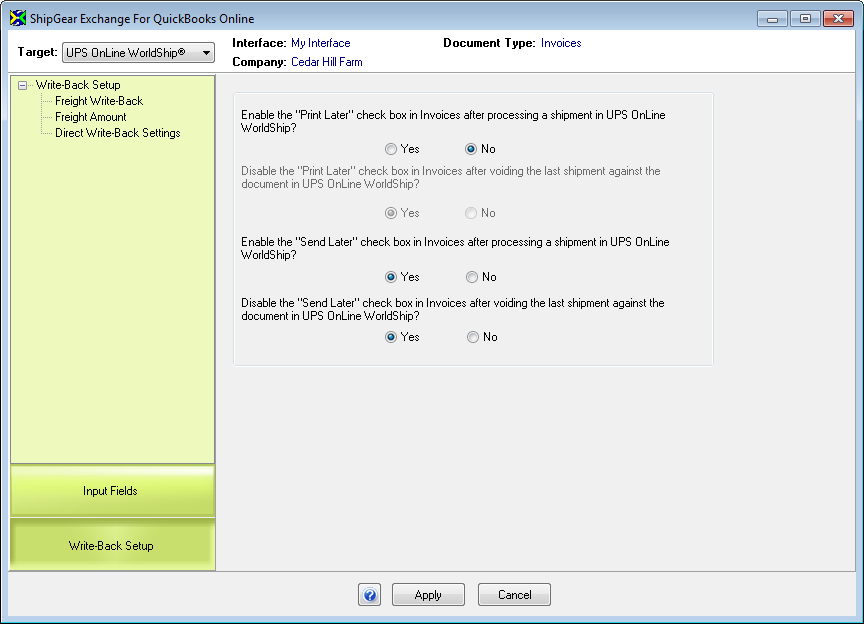
The Print Later and Send Later settings in QuickBooks Online allow you to mark an Invoice or Sales Receipt to be sent or printed later, so that you can batch print or send many transactions at once instead of one by one.
ShipGear can check one or both of those options for you automatically when you process a shipment, and uncheck them if you void a shipment.
Adjust these settings as desired. The default selection is Yes. Click Apply when you are done making changes.
Enable the "Print Later" check box in Invoices/Sales Receipts after processing a shipment in "carrier system"?
If Yes is selected, the "Print Later" check box will be enabled for the transaction after you process the shipment in the carrier system, and the transaction will be added to the "Print Later" queue.
Disable the "Print Later" check box Invoices/Sales Receipts after voiding the last shipment against the document in "carrier system"?
If Yes is selected, when you void the final shipment of a document (Sales Receipt, Invoice), ShipGear will deselect the "Print Later" check box.
Enable the "Send Later" check box in Invoices/Sales Receipts after processing a shipment in "carrier system"?
If Yes is selected, the "Send Later" check box will be enabled for the transaction after you process the shipment in the carrier system, and the transaction will be added to the "Send Later" queue.
Disable the "Send Later" check box Invoices/Sales Receipts after voiding the last shipment against the document in "carrier system"?
If Yes is selected, when you void the final shipment of a document (Sales Receipt, Invoice), ShipGear will deselect the "Send Later" check box.