In order to populate the WorldShipâ fields with the correct shipping data from your financial system, ShipGear has a mapping system that defines which fields in the financial system are mapped to fields in WorldShipâ. For example, in your financial system, you have fields that store the ship-to address. By default, ShipGear maps to these ship-to address fields in WorldShipâ. When you ship against an order (or other source document), the ship-to address is automatically populated in WorldShipâ.
This is ShipGear’s field mapping feature. Some field maps are included in the ShipGear default interface. You can also customize field mapping to suit your company. To access, view, or edit field mapping, first select an interface:
In the ShipGear Exchange window, click the Customize Interface button.
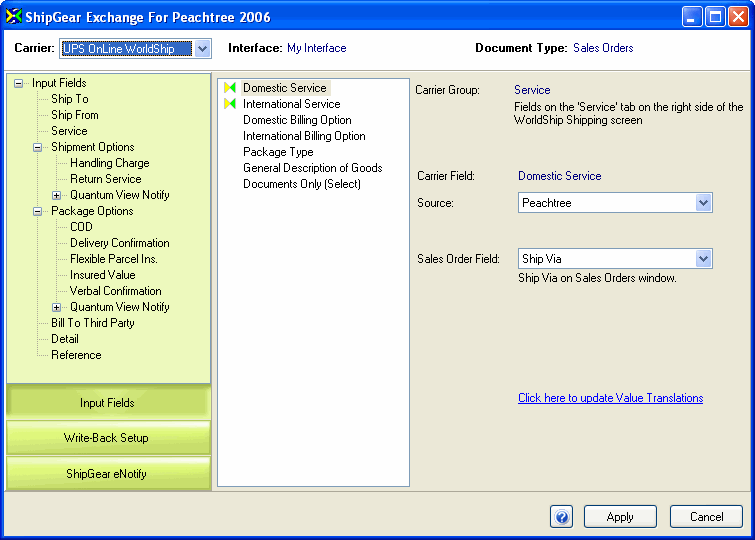
Click the document type (i.e. Sales Orders, Invoices, Customers) to access the Edit Interface window, which allows you to customize which financial system fields are mapped to WorldShipâ input fields.
The Edit Interface window consists of three panels. Click on the graphic below for more information about any of the fields or sections.

Key
![]() : Fixed value; see example
: Fixed value; see example
![]() : Financial System value; see example
: Financial System value; see example
Default Field Mapping Example
Some fields are mapped in ShipGear by default, such as in the Quantum View Notify 1 group. This group handles how Quantum View notifications are sent. Let’s look at this group as an example of how fields are mapped to achieve a specific result … in this case, to automatically send Quantum View notifications for each shipment via e-mail using the financial system Customer’s e-mail address.
To see the current mapping for the fields in this group:
Select the Shipment Options group from the WorldShipâ Input Fields tree.
Select the Quantum View Notify 1 subgroup.
Now let’s go over the mapping.
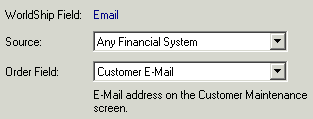
If you select the Email field from the middle panel, you’ll see an example of a field that is mapped to a financial system source, the "Customer E-mail" field, and its location.

Let's look at two other types of default mapping using Quantum View Notify 1.
Here is an example of a Fixed Value source:
Select - Click on the Quantum View Notify 1 (Select) field. You’ll see it is mapped to "Fixed Value," which in this case is "selected." Select can only have two values - selected and not selected. This mapping indicates that Quantum View Notify is enabled in WorldShipâ for each shipment.

Type - Click on the Method (Fax or Email) field. This has a fixed value of "Email." This mapping shows that the Quantum View Notify method will default to Email in WorldShipâ.

Note: ShipGear automatically disables Quantum View Notify if the type is set to Email and the e-mail address is left blank.
Finally, here is an example of a field value source that is set to None:
Click on the Fax field. Notice that the Source is set to "None," meaning that this field is not mapped.

Notes about Value Translation Rules
Customized Field Mapping Examples
ShipGear also allows you to modify and customize field mapping. Here are two quick examples. To do these examples, make sure you are in the Edit Interface window for the interface you want to edit, as described earlier in this topic:
Email Notification Memo
You want to include a personalized memo with your e-mailed ship notification, for example, "Thank you for your order." To do this, select Shipment Options > Quantum View Notify 1 subgroup. Select the Memo field from the center panel. You’ll see that the Source is currently set to None. From the Source drop-down list, select Fixed Value. In the Always set to: field, type your message: "Thank you for your order."
Set Insured Value to Off
You want "Insured Value" to always be unchecked by default. To do this, select Package Options > Insured Value subgroup. Select Insured Value (Select) from the center panel. The Source is currently set to a Fixed Value of "selected." Uncheck the box.
When you are done with these examples, click Apply!
There are two types of WorldShipâ fields:
those that accept any information or "string" as input,
those that only accept a specific list of possible values.
In the latter case (2), we need to define Value Translations for those fields. Value translations are just what they sound like … a way to take a financial system value and change it to a value accepted by WorldShipâ. Examples of such fields in WorldShipâ are Domestic Service, Saturday Delivery (Select), or Package Type. Once these fields are mapped to your financial system fields, we then need a way to make sure that WorldShipâ gets values that it recognizes. That is where the ShipGear Value Translations come in. Value translations define how the values from your financial system are translated into WorldShipâ fields that require a set of allowed values.
Where do the values come from?
There are two sources:
Your financial system: Values you set up in the financial system, such as Ship Via.
Adding them: If the field doesn’t have a values list in your financial system, you can add values in ShipGear.
Built in ShipGear features for Value Translations
Default Value Translations:
ShipGear looks for key words in the financial system's input string and returns a default value for the WorldShipâ field. It also can translate a string value into a WorldShipâ field value based on key words.
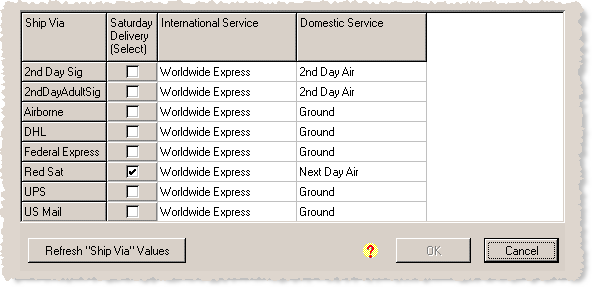
When you select a document (i.e. Customers, Sales Orders, etc.), default Value Translations are used if you haven’t specifically set a value translation. You can see the default translations currently applied by accessing the value translations window in ShipGear Exchange (the Click here to update Value Translations link on the Edit Interface window).
See Default Value Translations
Rules:
Rules are applied when one financial system field is mapped to multiple WorldShipâ field/value. ShipGear checks against these rules to make sure they are allowed together. When ShipGear applies rules, it uses the precedence that is shown in the Value Translations window (higher precedence to the left). However, when you (the user) change values manually, your changes are given the highest precedence.
Rules are applied to all fields in a shipment so that the data sent to WorldShipâ is consistent.
To access Value Translations:
With the WorldShipâ field for which you want to set Value Translations selected, click the link that says "Click here to update Value Translations."
The Value Translations window appears. This window shows you a list of the existing Value Translations for a field. Click on the image below for field descriptions:

Refresh Values:
To get the newest values from your financial system, click the "Refresh ‘field name’ Values" button. If an "Update" button appears, you can add and delete values as shown in the next section.
Add values:
Select "Update ‘fieldname’ Values." (replace 'fieldname' with the name of the field you've selected)
In the Value List, type any values that could be entered for the field you selected.
Note: You can also delete values by selecting them here and pressing the Delete button on your keyboard.
Click OK.
If necessary, assign value translations for you newly added values.
Click OK again to exit Value Translations.
Change Value Translations:
In the Value Translations window, modify the Value Translations as desired. ShipGear will check your changes against the set of built-in rules that coordinate with UPS shipping rules.
Field Mapping and Value Translation Examples
The following examples show you how to use field mapping in conjunction with Value Translations:
Store the freight billing information in the Customer record