The Template Designer allows you to create and edit both user and system templates. System templates are global sample templates distributed with the eNotify application; user templates are user-created or modified templates. By default, the Designer opens displaying a blank or new template, which you can use to design and save a new user template. You also have access to a Template Manager, a tool that allows you to open templates and administer their properties.
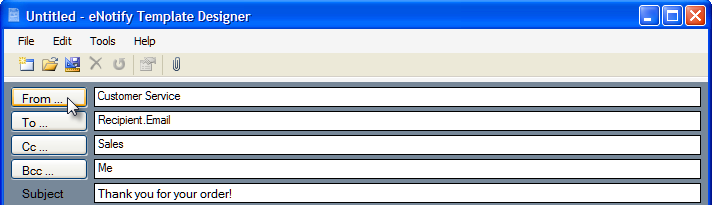
The Designer's interface is comprised of different sections that make up the final email. The final email appearance may be slightly different than the template's design depending upon the email platform (Google, Yahoo, etc.) used by the email recipient.
This topic gives you an overview of the components that make up the Template Designer window.
Using Quantum View Notify data in the Email fields
eNotify allows you to add fixed email addresses or email addresses from shipment data (including User Defined fields) to the Email Address fields. Simply click on any of the field names to add email addresses. The From and Cc, Bcc fields are only displayed if the options to display them are checked under Edit > Preferences > Designer > Email Header.
Note that the From field is limited by what is allowed by your email server. See Preferences for more information.
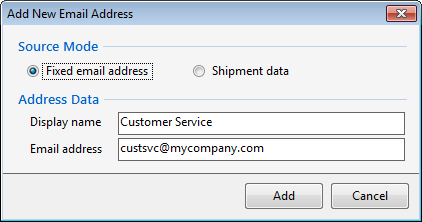
Fixed
On the Add New Email Address dialog, select a Fixed Email Address to enter the address data yourself.
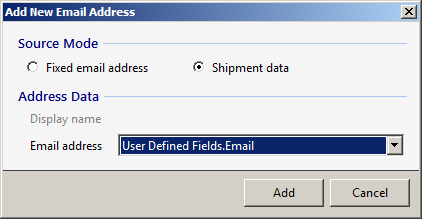
Shipment Data
Or, you can choose to populate the email address from Shipment Data. You can select from a list of fields in the Email Address field.
Note : If you create and enable a template that uses a dynamic email address from the shipment data, and that email field is not populated in the shipment, an email will not be generated.
Using multiple email addresses
eNotify supports multiple email addresses in one field, separated by a comma or semi-colon; however, you must use a User Defined field from ShipGear Input fields to store the email addresses, and then select that User Defined field in the Email Address field here :
This section applies to users who want to use Quantum View Notify email data in the To, Cc, or Bcc fields, but who have chosen to use eNotify and disable Carrier Email Notifications. The QVN fields cannot be directly referenced in the Email fields. You have to map whatever user defined field in your source interface (ERP) contains the QVN data to a ShipGear User Defined field that you've created. Then add that ShipGear field to the Email Addresses instead.
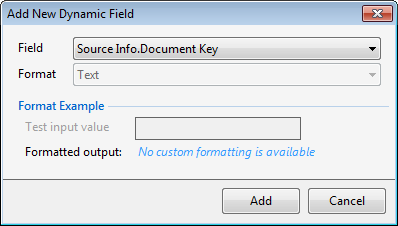
Enter the subject line for this email notification. You can type directly into this field or select a dynamic field to insert (Right-click > Insert Dynamic Field).
When selecting a dynamic field, most fields are imported directly without formatting. For fields that allow formatting, you can enter a test input value to preview the formatted output.
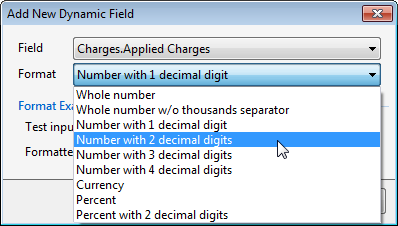
For fields where a plain integer is required, select the way you want the integer to display. You can preview your selection below.
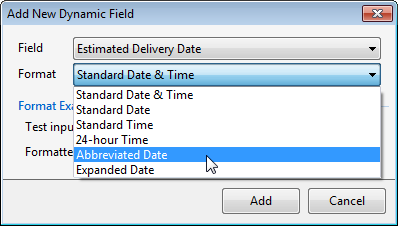
For date fields, select the date format.
This is where you create the email body. To add text, you can type directly into the window, and add other elements using the tools provided. Click a link below for more information about each element of the email body :
This tab allows you to preview the built email with actual shipment data. Right-click in the tab and select Load Preview Data from the pop-up menu. You can then select from a shipment list and click OK to populate the template preview with that shipment's data.